The Third Type of Isometric Training Most People Never Learn

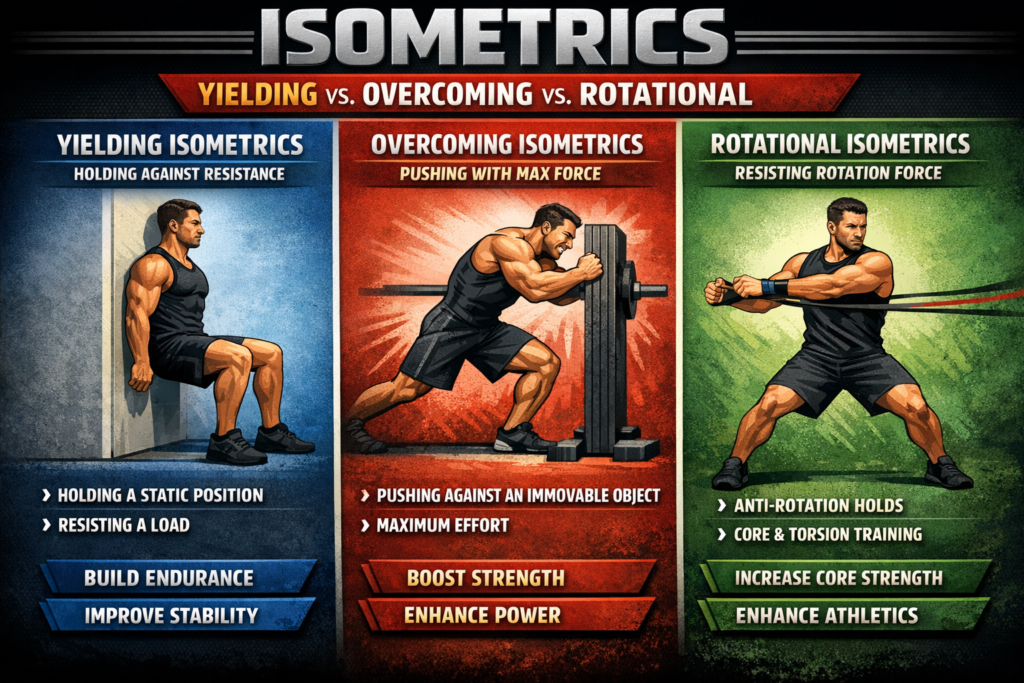
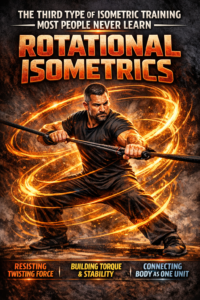
The Third Type of Isometric Training Most People Never Learn (Rotational Isometrics)

Most people think isometric training means one thing:

Holding still.

Planks.
Wall sits.
Horse stance.

And if they go a little deeper, they might discover overcoming isometrics—pushing or pulling against an immovable object.

But there is a third type of isometric training that almost nobody talks about.

And it’s the one that most closely resembles real martial power.

It’s called:

Rotational Isometrics


Why Most Strength Training Falls Short

Most strength training is linear.

Up and down.
Push and pull.

Even most isometric training is linear:

You hold a position.
Or you push in one direction.

But martial arts are not linear.

Punches rotate.
Throws spiral.
Grappling involves torque, pressure, and redirection.

Power doesn’t move in straight lines.

It moves in curves, spirals, and angles.

And if your training doesn’t reflect that…

Your strength won’t transfer.


What Are Rotational Isometrics?

A rotational isometric is when you create tension by resisting rotation or producing force in opposing directions.

Instead of holding still…

You are actively creating twisting force inside the body.

Examples include:

• resisting a band pulling you into rotation
• twisting into a stance without moving
• creating opposing forces between upper and lower body
• diagonal push/pull tension patterns
• rotational squat holds
• Dragon Coil Holds

The key idea:

You are not just holding position.
You are organizing force through the body.


What Rotational Isometrics Train

This is where things get interesting.


1. Fascial Chains (Not Just Muscles)

Rotational tension travels through the body in diagonal patterns.

This activates:

• anterior/posterior sling systems
• cross-body fascial lines
• spiral tension chains

These are the exact pathways used in:

• punching
• throwing
• takedowns
• weapon work


2. Internal Connection

Rotational isometrics teach the body how to:

• connect upper and lower body
• transmit force across the torso
• maintain structure during movement

This is what many internal arts call:

“whole-body power”


3. Torque and Pressure

Linear strength pushes.

Rotational strength twists and compresses.

This is what creates:

• heavy hands
• crushing grappling pressure
• destabilization of opponents


4. Anti-Rotation Stability

Ironically, training rotation improves your ability to resist rotation.

This is critical for:

• defending takedowns
• maintaining base
• staying balanced under pressure


Why This Is the Missing Link

Here’s the problem:

Most people train:

✔ Yielding (structure)
✔ Overcoming (force)

But they skip:

❌ Direction of force

So their strength exists…

…but it doesn’t transfer cleanly into movement.

Rotational isometrics fix that.

They teach the body how to:

organize force through angles


The Martial Connection

If you look at traditional systems:

• Tai Chi → silk reeling
• Bagua → circular walking
• Xing Yi → directional force
• Jujutsu → kuzushi (off-balancing)

They are all based on:

rotation and redirection of force

Rotational isometrics are the modern bridge into that training.

They make those principles:

• measurable
• repeatable
• physically trainable


How I Use Rotational Isometrics

Inside my system, rotational work comes after structure is built.

Because without structure, rotation becomes collapse.

Here’s how it fits:

Step 1 — Yielding Isometrics

Build structure and endurance

Step 2 — Overcoming Isometrics

Build force and power

Step 3 — Rotational Isometrics

Organize and apply that power


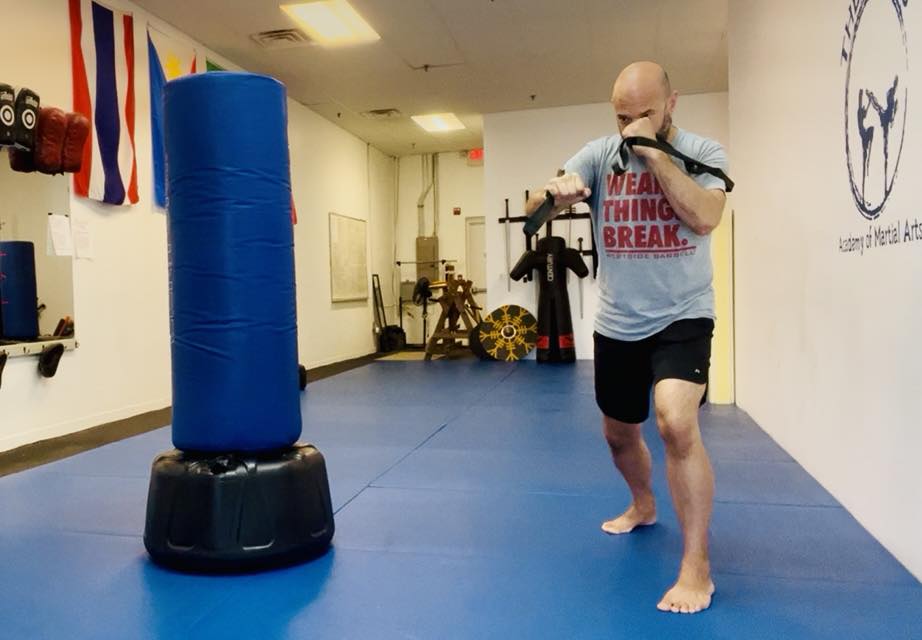
Example Drill — Diagonal Push/Pull

Set up:

• Attach a band or strap
• One hand pushes forward
• One hand pulls back
• Hips remain stable
• Spine tall

Hold for 30–45 seconds.

Focus on:

• creating tension through the torso
• breathing calmly
• feeling force travel from foot to hand

This is not a “hold.”

This is a force pattern.


Example Drill — Dragon Coil Hold

From a squat:

• rotate the torso
• maintain lower body alignment
• create opposing tension

This develops:

• spiral strength
• hip integration
• rotational power


Where Most People Go Wrong

They try to muscle the movement.

But rotational strength is not about squeezing harder.

It’s about:

• direction
• alignment
• connection

Too much tension kills the effect.

Correct tension distributes it.


How This Fits Into My Programs

If you’ve been following my work, you’ve already seen these layers.

The Isometric Warrior Training Guide

Builds structural foundation through yielding isometrics

👉 Learn more here


The 21-Day Isometric Forge

Introduces overcoming + diagonal tension

👉 (Free bonus program inside the private Isometric Warrior Brotherhood)


The Iron Silk Method

Fully integrates:

• tendon elasticity (Yi Jin Jing)
• rotational force
• breath-driven power

👉 Learn more here


Final Thought

Most people train strength.

Very few train how strength moves through the body.

That’s the difference between:

Looking strong…

and feeling powerful.

Rotational isometrics are the bridge.

Train them seriously, and your strength will begin to show up where it actually matters.


Jon Haas
The Warrior Coach

5 Ways to Increase the Effectiveness of ANY Exercise

Last night at the gym as I was having a post-training conversation with one of my students, and he asked me – “how do you know how to make every single exercise we do more challenging???”

It’s a good question, is it not?

How do you take ANY exercise and make it more effective?

Well, there’s 5 different ways to do that…


  • Use a heavier weight. I always say – everything is easy until it gets heavy! This however is not a factor in bodyweight exercise since the weight is always the same. You can however adjust the leverage to make the exercise easier or more challenging.
  • Add more sets or reps. This, unfortunately, is what most bodyweight exercise programs do – continue to add sets and reps. While it works for a little while, overtime, the workouts simply become monotonous and boring.
  • Reduce or eliminate the rest periods between the sets.
  • Adjust the tempo (the speed at which you do the exercise) – making it faster or slower can change the effect and the level of difficulty
  • OR…. and this is a BIG one ….. Increase the sophistication of the exercise so it creates a greater demand and thus a greater training effect on the nervous system


Inside the brand new Bodyweight Mastery Program we focus on the last type of progression. We incrementally increase the level of sophistication for each new movement to focus on the most effective way to create lasting change in your strength, endurance, mobility, energy levels, and body composition.


Each of the 6 movement patterns have 6 progressions that move in sophistication from basic to advanced over the course of 6 weeks.

6 Movement Patterns Trained in Bodyweight Mastery:

  • Push-up x 6 Levels
  • Squat x 6 Levels
  • Lunge x 6 Levels
  • Frog Press x 6 Levels
  • Core x 6 Levels
  • Isometrics x 6 Levels

Inside the Bodyweight Mastery Program you will progress through 6 unique variations of the 6 foundational (notice I did not say ‘basic”) movements to build a very unique type of strength and flexibility that builds muscle, burns fat, and increases your daily energy all at the same time!!


A Stronger Core, NOW

So, I’m in the middle of training one of my oldest clients and one of the exercises in the set happens to be a push-up on a medicine ball.

Now, we’ve done this exercise at least 100 times together, but this time as I demonstrate it she makes an astute observation – “your core is doing all the work, isn’t it?”

“Yup.”

In fact, we’ve had this conversation many times, but repetition is the mother of skill, so I continue…

“Yes. Actually, any exercise, if done properly, is a core exercise.

For example, when you assume the push-up position, your legs are tight and heels pushed back – squeeze the quads. Your glutes are tight – squeeze your butt. And you must brace your core isometrically.

This means you tighten your entire midsection as if you were about to be gut punched – got the image?

ALL movement and strength translate through your core, so the better you can integrate your breathing with your movement with your alignment through the center of your body the stronger, more powerful, and more injury-resistant you will be! (read that again)

The BEST “Core” Exercise

“In fact, I continued, do you know what the best “core” exercise is? A heavy overhead press.

Why?

Because, as we said above, all strength translates through your core and your entire midsection must be braced to support the weight over head. This isometric bracing of your core is a powerful way to get very strong!

Now, when you do that in every exercise (bodyweight or kettlebell or otherwise), guess what you are doing?

That’s right – you’re training your core to fire in every movement which not only stabilizes the body but enhances your strength and power output as well. Add in the breathing and you are superhuman!

Here’s a video on how to perform the perfect push-up.

Note the emphasis on the core tightening and the breathing!


Looking to take your push-up game, and your core strength, to the next level?

Master your strength with the Push-Ups for Internal Power program


FREE Stay at Home Workouts

Since all the gyms are closed and we are all stuck working out at home for the foreseeable future, I want to hook you up with a free copy of my WarFit Combat Conditioning program.

This hard-hitting program will build serious functional strength, torch fat like nobody’s business, and prepare you to face anything – including zombies!

So go HERE and grab yourself a copy on me.


This program usually sells for $37 but today you can pick it up for $0.

If you are financially able, and would like to donate something for the program, please do so HERE.

If you are not able to do so, don’t worry about it. Train and enjoy with my blessing! 🙂


Also make sure to go HERE and pick up my free follow along Joint Mobility Routine to keep you strong, mobile, and energized!

10 Step Upper Body Pushing Progressions

10 Step Upper Body Pushing Progressions
By Logan Christopher

Back in 8th grade my older brother started training me to get ready to go out for the football team in high school. He was a star player and hoped I would follow in his footsteps.

Unfortunately, to say I was weak and unathletic was an understatement. When I started, I couldn’t even do a regular pushup in good form!

Fast forward many years later and I’m repping out full range handstand pushups.

That is what progressive strength training can do when you follow it consistently. Progression is a fairly simple concept, but one that most trainees unfortunately don’t really get. This is especially true when it comes to bodyweight training.

My goal in this article is to give you the keys to progression by showing how you too can go from not even being able to do a regular pushup to full range handstand pushups. (And if you’re anywhere in between that means you’ll just get there with fewer steps.)

The trick with bodyweight exercise is to do progressively harder variations of an exercise over time. This is done by manipulating leverage, range of motion, body position and more. Here’s the ten steps and then we’ll dive into details on each one.

1.         Knee pushup

2.         Incline pushup

3.         Regular pushup

4.         Decline pushup

5.         Pike pushup

6.         Handstand shrug

7.         Partial handstand pushup

8.         Handstand pushup

9.         Elevated handstand pushup

10.       Full range handstand pushup

These are the ten steps for this exercise series as I lay out inside of The 80/20 Strength Challenge. There’s more detail inside the course, but below is enough to get started with.

Step 1 – Knee Pushup

Kneel down. Place your hands flat on the ground approximately shoulder width apart. Straighten your body so that you are one line from the thighs, the back, up to the shoulders. Do not let the hips pike up or sag. The head should be kept in a neutral position.

Start with the arms locked out then allow the elbows to unlock and the body to be lowered by the strength of the arms. Do not protrude your head or sink your hips to touch the ground. Lower under control until your chest touches the ground then push back up. This is one repetition and should be repeated.

 Step 2 – Incline Pushup

Get something stable like a chair (without wheels). Make sure this will not move, fold or otherwise put you in danger. Platforms, steps, or various other objects can be used.

Place your hands on the chair. Walk your feet back so that your body can be a straight line from the legs through the back. Do not let the hips pike or sag. I’m going to be saying that a lot. Lower by the strength of your chest and arms. You might touch your chest to the chair. It depends a bit on the angle and the chair. Push back up. This constitutes one rep. Repeat.

Step 3 – Regular Pushup

To maintain good form your body should be kept tight. Do not allow any sagging in the hips. Do not have your butt sticking up in the air either. Your body should form a straight line and be kept rigid like a board.

Your hands are placed on the ground shoulder width apart with the fingers pointing forward. Lower your body with your arms and the elbows close to the sides. Do not make the common mistake of letting your elbows flare out to the sides. This can be bad for your shoulder joints. Keep the elbows in! Your chest should touch the floor lightly and then you press back up. Repeat for reps.

Step 4 – Decline Pushup

Using the same stable chair or other object as before, this time place your feet on it and your hands on the ground. Otherwise, the form is the same as in the normal pushup.

Step 5 – Pike Pushup

Place your hands on the ground shoulder width apart and fingers facing forward. You must keep your legs straight with your butt up in the air when you perform this exercise. This is that same as a downward dog position in yoga.

Bend your arms while keeping your legs straight. Your heels will come off the floor. Touch your head or nose to the ground and push back up. Your elbows should not flare out to the sides much, if at all, but stay in line with your body.

Step 6 – Handstand Shrug

From the pressed out handstand position relax your shoulders and think of bringing them toward your armpits. Pull them into the socket. But do not bend your elbows. The arms should remain tensed and locked out throughout this exercise. Even think about squeezing the triceps hard enough to cramp them. The movement is made solely by the shoulder girdle. It is awkward at first but can be mastered with a bit of practice.

After you have lowered by action of the shrug you press back up. Repeat back and forth. Once again, do not bend the arms. This exercise only takes you through an inch or so of motion. With practice, you can do a large number of repetitions in this exercise.

Step 7 – Partial Handstand Pushup

We switch from the handstand shrug to bending the elbows, but only for a partial range of motion (ROM). The easiest way to do this is to place a stack of books or something similar under your head. Thus, instead of lowering your head all the way to the ground, it only touches these books then you press back up.

Once your stack is in place, get up into the handstand in the same steps as before. Once locked out, bend the elbows so that the top of your head lowers down to the stack. As soon as it touches press back up to lockout. Repeat. Remember to breathe.

Step 8 – Handstand Pushup

Kick up into a handstand against the wall. Keep your head in line with your arms. Bend the elbows and lower yourself under control until your crown touches the floor then press back up to lockout. It is best to touch the top of your head to the ground, instead of looking down and touching your nose. The latter is harder and then causes more arch in the back. Arch is not bad, unless it is overdone.

Step 9 – Elevated Handstand Pushup

You can use many objects for this. Pushup handles, parallettes, steps, mats, chairs, blocks of wood, kettlebells, hand balancing stands and stools all work. One caveat with whatever you choose to use. I shouldn’t need to tell you that dire consequences could result from using unstable or poor equipment. As long as it provides a stable place to put your hands and it will hold your full body weight it will work.

Step 10 – Full Range Handstand Pushup

The handstand pushup as covered in any of the prior steps is actually only a partial range movement. Step 8 is just the top half of a press. The previous move extends this a bit further. But here with the full range handstand pushup we’re finally going to get the complete range of motion.

Kick up to a handstand against the wall with your hands firmly placed on two sturdy objects like chairs. Lower under control until your hands are touching your shoulders. Press back up to lock out.

How to Progress from Step to Step

You obviously won’t go from one exercise to the next in a single workout, but that’s where another key aspect of progression comes in. I’m talking about volume!

It doesn’t matter what step you’re at, in your workouts you want to build up the amount of volume that you can do.

How many reps can you do in a single set?

If you can do five today, aim for six next time.

How many total reps, spread across many sets, can you do?

If you can do 30 total reps today, aim for 31 or more next time.

Increase these numbers over time and it means you’re getting stronger. Get stronger and soon enough you’ll be able to move onto the next step. And then the next step.

Over time, this is how you too can go from not being able to do regular pushups to full range handstand pushups. It’s how I did it and it’s how you can too.

Want more? Inside The 80/20 Strength Challenge you’ll find more details on the above exercises, as well as similar progressions for squats, inverted rows to pullups, hanging knee and leg raises. You’ll also find a precise structure that makes sure you improve in all of these in just one hour per week of work.

Find out more details here.


The Aiki Push-Up

The Aiki Push-up is a literally a one-stop-shop in the study of internal power building. It was rumored to be part of Daito Ryu master, Yukiyoshi Sagawa’s secret training regimen.

Sagawa Training
Here’s a video where I explain the purpose and it and how to do it.

Watch carefully as the Aiki Push-up may look similar to what you already know, but the entire engine driving it is different!

Don’t fall prey to the common idea of thinking you know something just because you know about something! Be diligent in your study and your training – go deep!

“A little knowledge is a dangerous thing…”

Learn all the fundamental building blocks to the Aiki Push-up, as well as creating Internal Power (plus much more!) HERE!

Training in Confined Spaces

If you have Warrior Fitness Training style questions, send them to me.  I answer any and all serious (well, mostly serious) questions about training, my Warrior Fitness System, my views on fitness, martial arts, self defense, strength & conditioning, or training for sport/athletic performance.  

Here’s a video answer to a question I received the other day from Robert, a Bujinkan student in Sweden. Continue reading

Lessons in the Mud

Warriors Are Mudders Too!

This past Saturday I, along with my brother Dave and my brother-from-another-mother, Jason, ran the ultimate Adventure Race, the Tough Mudder!  If you are not familiar with the Tough Mudder, let me explain.  It is a 12 mile race with 25 military style obstacles between mile 1 and mile 12.  Oh yeah, and lots and lots of mud!  Continue reading

A Workout for Mere Mortals

Today we are going to look at a workout for the fitness novices out there.  If you are older, maybe a little out of shape, recovering from an injury, just getting started with your fitness program or simply looking for sustainable progress in your workouts, this post is for you. Continue reading

10 Minutes and a Chair

So here is the challenge, you have only 10 minutes to train and the only piece of equipment available is a dining room chair.

Are you prepared?

Can you rock a great minimalist workout with this limited time and equipment? Or, should you just use the chair for a short snooze?

Here’s one answer:

Continue reading